

Friday, June 30, 2017
Thursday, June 29, 2017
rainbow veggie bowl

Lately I've been making some small changes to my diet and for the last month, I've been trying to eat more of a plant based diet. And so far I am feeling amazing! While I still eat fish and chicken once in a while, I've found that loading up my meals with a crazy amount of vegetables and whole grains has really agreed with my body.

One of my favorite things to do is to "eat the rainbow". I load up a big bowl and challenge myself to include veggies with all the colors of the rainbow. Here is one of my favorites-
INGREDIENTS:
Scoop of rice
Tomatoes
Carrots
Cucumbers
Yellow peppers
Pea shoots and mixed greens
Avocado
Roasted purple potatoes
Purples cabbage
Scoop of spicy green hummus

Wednesday, June 28, 2017
free coloring download for you!


Tuesday, June 27, 2017
creating with make wells- 3 tips for finding your lettering style AND A SALE!

Hello! It's Megan here with another lettering post but I also wanted to let you know that I've got my lettering classes on sale this week.

There’s no way around it people, hand lettering, brush lettering, calligraphy - all of it - it’s popular right now. If you are reading this, then you probably have jumped on the Letter Bandwagon - so welcome to the club!
I’ve been working professionally as an “artist who draws letters” now going on 5 years, and I’ve worked REALLY hard to try and create my own style and “look.” And trust me, in a sea of talented lettering artists, it’s tough to create your own little niche. But truly, the best compliments I ever receive are when people say, “I knew as soon as I saw this that you made it!”. That makes me swoon, and inspires me to keep creating what is ME.
So, today I want to share with you 3 Tips to Help you find YOUR lettering style!

So here’s what I mean - because there is nothing wrong with tracing as a way to practice. Just try not to rely on tracing alphabets with fancy pens as your sole source of learning and practice.
Pick up a pencil and a blank sheet of paper and start drawing!
Tracing is a great way to practice strokes with different pens and is especially useful for practicing brush lettering techniques - but if you don’t learn to really DRAW the shapes of letters on your own, you might find it harder to branch out and discover new styles - and ultimately YOUR style!

And that affected my work. And my originality.
So put your head down and practice. If you want to achieve a style that’s YOURs, make sure you spend just as much time practicing without feeling the need to constantly reference Pinterest or Instagram for inspiration. That’s going to force you to pull from within and rely on your own creativity.
Of course we all love to look, pin, and like - just make sure you balance that with healthy doses of shutting off the screens and flying solo with your paper and supplies.

Sometimes there can feel like there are a lot of rules you just don’t want to break with lettering - achieving perfect curves, drool worthy flourishes, consistent weight, blah blah blah.
But you know what also looks cool? Imperfect letters.
I won’t pretend I haven’t seen a piece before and winced at how goofy looking the lowercase g looked. It happens. Sometimes people draw really bad looking letters. I mean, let’s just be honest here. Not every imperfection is going to be a homerun in the lettering proverbial ballfield.
But imperfections are often interesting. My work is quirky and whimsical and expressive, mainly because my strength is NOT being super perfect and precise. I tend to be impatient, which can lead to messy-ness. But instead of fighting against this “weakness,” I’ve just embraced the way I like to work, and that’s helped me create a style that feels very ME.

I hope those 3 little tips will help get you on your way to finding your own lettering style!
Xo, Megan
Instagram @makewells
Be sure to check out my lettering classes here!
Monday, June 26, 2017
a peek inside my collage art journal

As many of you know, my latest class Cut and Create begins today and while I finished creating this class a while ago, I can't stop cutting and collaging! For the last few weeks I have been working in an art journal that I have dedicated to abstract collage. This process has been such a fun way to create with zero pressure and expectations!
Here is a little peek into my collage art journal-


Friday, June 23, 2017

Thursday, June 22, 2017
NEW CLASS- cut and create

Friends! I've got another online class getting ready to launch on Monday! I'm kinda excited about this one because it was so much fun to make! Here is a little peek-
CUT and CREATE
begins June 26
$15.00
I don't know about you but when it comes to the creative process I have ALL KINDS of creative experiments, demo pages, color swatches, half filled pages, mistakes and test surfaces. In this class we will be using up all those "toss away" pages and giving them new life! We explore shapes and abstraction through cutting and ripping up all that paper. Then we will transform those bits and pieces of color into unique collaged surfaces.
more information or register HERE
All of my classes have unlimited access- once the class goes live you can create and access the class at any time and work at your own pace. There is no deadline or pressure to create.
This class like all of my classes, does NOT have a required supply list. Instead I will be sharing the supplies that I like to use and then give you a variety of options and inspiration to use supplies that work best for your process and budget.


Wednesday, June 21, 2017


Tuesday, June 20, 2017
marbled statement ring

My long time readers will know that I love colorful and funky statement rings! And I love using simple supplies to to make my own.

I am still loving Easy Marble (not sponsored) because you can use it on so many different surfaces. Recently I had the idea to marble some small wood slices to create light weight statement rings.
Easy Marble is a lightfast, quick drying paint that you can use on all kinds of surfaces. I've used a variety supplies to create a marbled effect- spray paint and nail polish and acrylic paint but Easy Marble is the best product I've tried.

Simply drop colors into a pan of water and swirl the color around. I wanted the design on my rings to look like an agate slice so I swirled the colors in a circle over and over again.

Dip the wood slice into the color and pull it out!

I used E6000 jewelry adhesive to adhere the wood slices to ring backs.
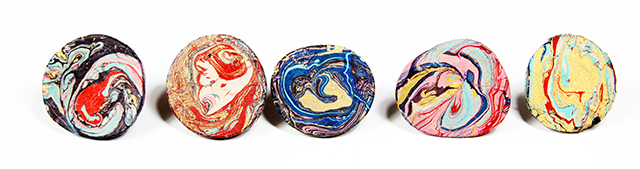
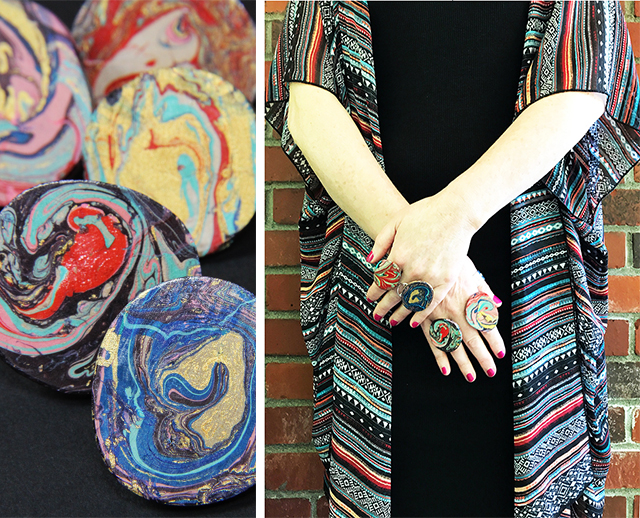
The result are colorful and funky statement rings!

Looking for more DIY ring projects?

wood burned rings shrink plastic rings stone statement ring faux turquoise ring colorful clay statement rings flower rings shrink plastic eye ring wooden bead ring
Monday, June 19, 2017
lets have a giveaway!

Hey friends summer is here and today I am celebrating with my good friend Megan Wells for a fun giveaway!
Megan is giving away a bundle of her lettering classes and I am giving away a bundle of my summer classes. Scroll to the bottom of this post to enter to win!

Lettering Bundle includes all 3 lettering classes from Makewells!
Summer Bundle includes all 4 classes from Alisa!
To enter to win-
Leave a comment
Let us know your summer plans!
We will each randomly pick a winner and announce at the bottom of this post later this week!
email me at alisaburke@gmail.com and we will get you access!


Subscribe to:
Posts (Atom)
LinkWithin

